

Ok! So this one has been much requested. When I first posted my foundation routine and did a quick picture of how I use my concealer, apparently a lot of people were like "what on earth is she doing!" Hehe. I am going to teach you what I use concealer for, and exactly how I use it! It is one of those things that can be used very wrong.
I would say concealer is one of the most important steps in my makeup look, and not for the reason you might think when you hear the word 'concealer'!
VERY IMPORTANT: I know it is called concealer... but we will actually be using it as a highlight. Now there are two kinds of highlight, the highlight that gives you a dewy glow and the highlight that brings forth and lights up certain parts of your face. Concealer is the kind of highlight that brings forth and lights up certain parts of your face. (Remember highlight brings forth and lights up and contour deepens and creates shadow)
A Bit About Concealer:
- Colour: Go much lighter than your skin. One to two shades lighter. I get the lightest one possible.
- Brand: Danger, there are a lot of bad concealers out there. A LOT.
- Form: Stick, tube, powder....? The one I will be using is a Tube with a built in applicator.
- Tone: too yellow, too pink, too orange. I try to go with the most toneless if that makes sense?!
- Consistency: too thick, too thin. I will be using a nice thin creamy one :)
- Staying power: Concealer should NOT be settling into your eye lines. Many brands will do this no matter what. I will show you how to prevent that with the right products and techniques.
- Covering acne: THIS Concealer is not your skin color and therefor will only bring attention to problem spots.
- Where: This is the one that I will really be focusing on today because it is the MOST IMPORTANT! :)
Concealer Process
 Step 1: Apply your primer, making sure you smooth it all over, focusing on your T-Zone. Make sure you smooth it under your eyes. Use your finger tips. This will help prevent your foundation and your concealer from settling into any lines around your eyes.... I squint a lot, so this used to be a problem for me, but with the two methods I use (see step 4), this is no longer a problem at all!

Step 2: Apply your foundation as usual. Take a look at my foundation routine if you like! I make sure to not put too much foundation under my eyes. I use my beauty blender to really sheer it out under my eyes.
Step 3:Get out your concealer! OK! My current FAVORITE concealer is Maybelline Age Rewind. This is my first choice concealer, it is the perfect colour for me, and it is the perfect consistency. Also, it has a great applicator that delivers a healthy amount (no one has time for those little nail polish wands!) I will be repurchasing!


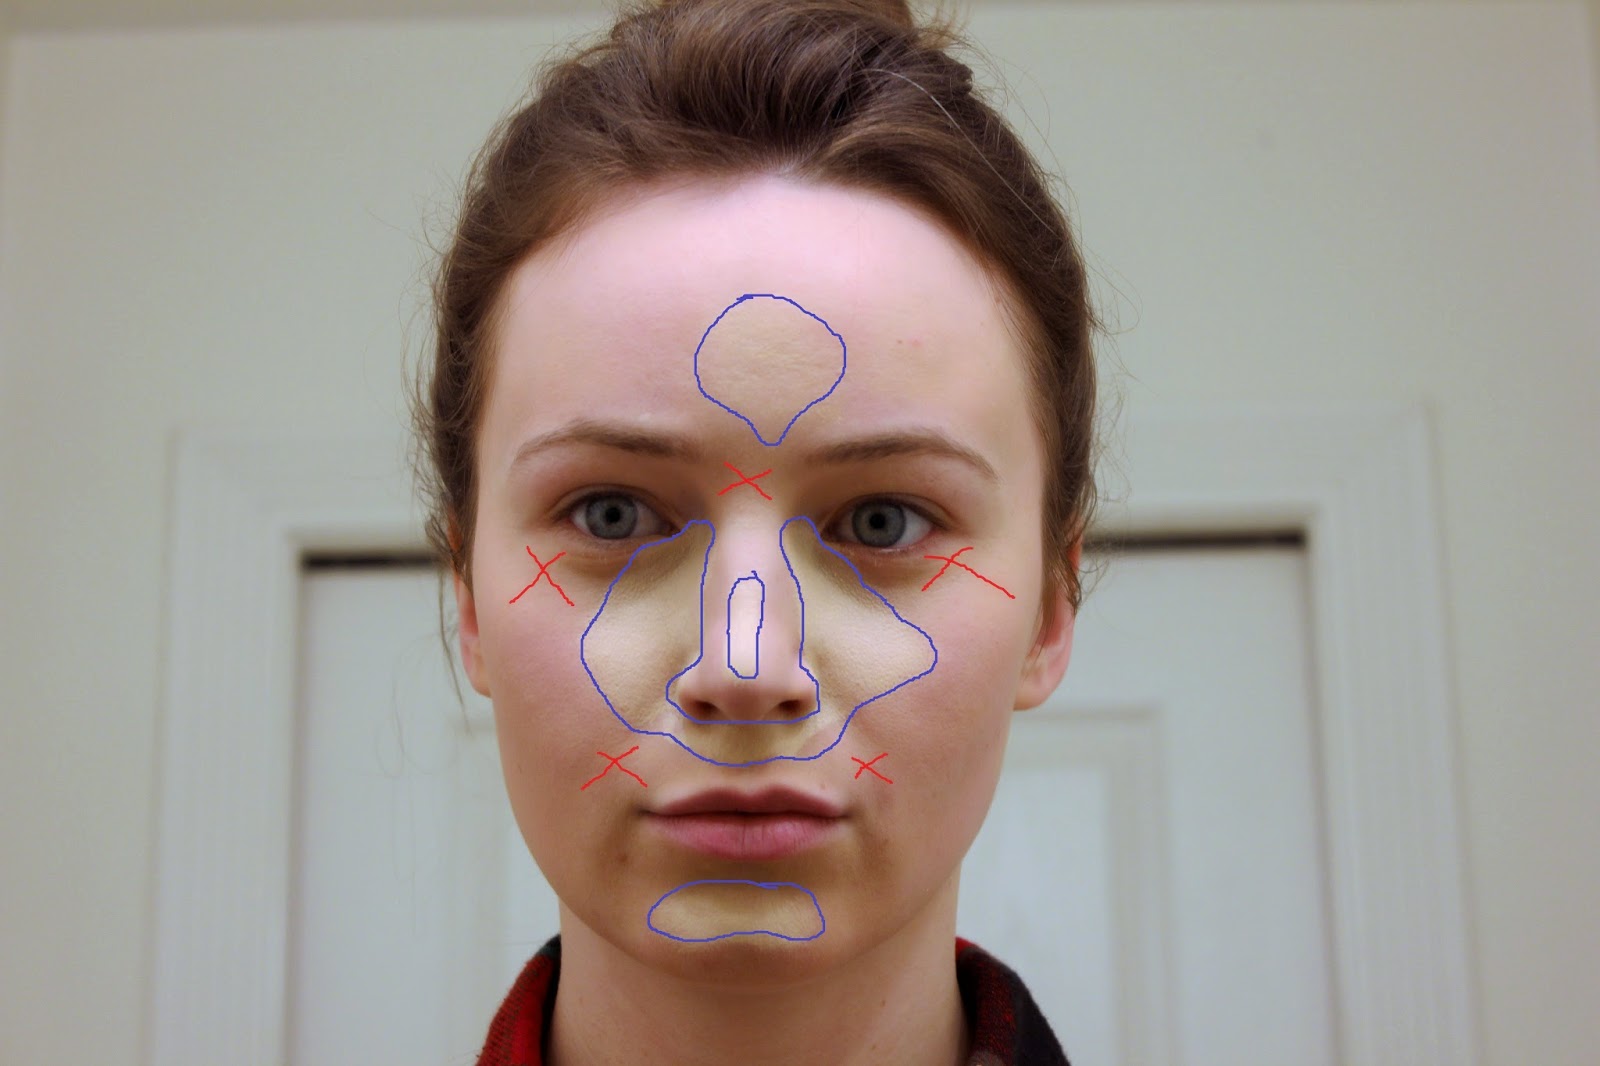 |
| Do not put concealer where the red Xs are. |
 |
| Sheer it out with your beauty blender along your cheek bones. |
 |


 Step 5: Use your beauty blender to to sheer out and blend your concealer.
IMPORTANT TIPS! The concealer should blend into your foundation, but not so much that it is the same colour (we want to keep some contrast). Try not to move the concealer too far from where you put it (for example do not connect the concealer on the ridge of your nose to the concealer along the base of your nose) (another example, do not move the concealer in the center of your forehead all the way out to your hair line). Concealer is not meant to be a second layer of foundation. Remember, when using your beauty blender do not smear or wipe... pat, press, or dab.
 Step 6: In these pictures I used my ELF HD translucent powder ($5 on eyeslipsface.com) to set my concealer. I just dusted it over top. This allows me to keep the full effect of the highlight I have created. On a regular bases I use my stay Matte powder, but I wanted to really show off the contrast and highlight for you guys! :)
Step 6: Finish up with bronzer, blush, glow-dew highlight, eye makeup, lip product, and TADA!
****If you have any questions about the look, don't hesitate to ask in the comments! :)*******


Stay Posted this week, because I will be posting more
about this look and the products and techniques I used to get it! :)
I feel clueless about makeup! I think I do a pretty good job, but I really have no idea what im doing. I never knew what a primer was until a year ago, I never knew what a concealer was or what it was used for until you blogged about it, and you just added a new one to my list...translucent powder? Girl, where have you been all my life ;) Im excited to get this make up and purchase concealer for the FIRST time haha. Your so beautful ;)
ReplyDeleteAll of you Prete girls always look flawless! :) Thank you so much, I love sharing this stuff and talking about it hehe. And yes the translucent powder is great to preserve the highlight. Once you put your regular powder over top, you lose a bit of the lightness. Just dust it over the highlighted areas :) I have repurchased this like 5 times!
DeleteOh and I wanted to say that I use the Age Rewind concealer in the colour 210 Fair. I remember we were talking about that :)
Thank you for reading, it means a lot!!
Your skin looks flawless!
ReplyDeleteThanks girl! I love your blog! I also love your country, I was there in September and can't wait to go back! :)
Delete-S
great post :)
ReplyDeletethanks for the tips
http://allornothing-blog.blogspot.co.uk/
Thank you :) You are very welcome! Stop by again some time! :)
DeleteI love the maybelline age rewind as well, I always go back to it though I don't have it in the white packaging.
ReplyDeleteIsn't it just the best?!? I don't know why it is white either, it is either because I bought it in America or because it is the lightest shade? Thank you for reading!
DeleteI'm eager to try Maybelline Age Rewind. Is it drying for under the eyes?
ReplyDeleteI don't find it drying at all! I hope its a good fit for you!
Delete